
'%20fill='%23524D7A'%20fill-rule='nonzero'%3e%3cg%20id='编组-6'%20transform='translate(1458.000000,%2019.000000)'%3e%3cg%20id='icon_search'%20transform='translate(369.000000,%209.000000)'%3e%3cpath%20d='M27.2327989,27.2307724%20C26.2067012,28.2564092%2024.5434975,28.2564092%2023.5173998,27.2307724%20L18.6383806,22.5017046%20L19.8596162,21.2455376%20L24.7483276,25.9837588%20C24.9962744,26.2402838%2025.375268,26.3203408%2025.7057868,26.1860082%20C26.0363056,26.0516756%2026.2519768,25.7299295%2026.2506412,25.3731744%20C26.251809,25.1411054%2026.1598722,24.9182581%2025.9954095,24.7545134%20L21.2477755,19.854762%20L22.5034727,18.6400544%20L27.2419528,23.5284987%20C28.2562407,24.5556758%2028.2521538,26.208623%2027.2327989,27.2307724%20L27.2327989,27.2307724%20Z%20M11.3750445,22.748846%20C5.09285099,22.748846%200,17.6564527%200,11.3746024%20C0,5.09275219%205.09249204,0%2011.3746856,0%20C17.6568791,0%2022.7497917,5.09203429%2022.7500891,11.3738845%20C22.7429673,17.6528528%2017.6543558,22.7411861%2011.3750445,22.7483075%20L11.3750445,22.748846%20Z%20M11.0001461,1%20C6.95558281,1%203.30927323,3.43638617%201.76148585,7.17307546%20C0.213698465,10.9097647%201.06924352,15.2108802%203.92918168,18.0708183%20C6.78911984,20.9307565%2011.0902353,21.7863015%2014.8269245,20.2385142%20C18.5636138,18.6907268%2021,15.0444172%2021,10.9998539%20C20.9938407,5.47964036%2016.5203596,1.00615933%2011.0001461,1%20L11.0001461,1%20Z%20M6.42925593,16.3204798%20C3.69977461,13.5855837%203.69977461,9.15733947%206.42925593,6.42244342%20L7.66772231,7.66084213%20C5.62129335,9.71224367%205.62129335,13.0328332%207.66772231,15.0842348%20L6.42925593,16.3204798%20Z'%20id='形状'%3e%3c/path%3e%3c/g%3e%3c/g%3e%3c/g%3e%3c/g%3e%3c/svg%3e)
How to Clean Cat Ears in 8 Steps
Updated on 04/26/24
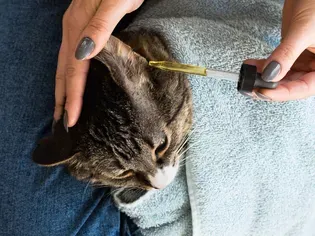
'%3e%3cg%20id='编组-3'%20transform='translate(368.000000,%201031.000000)'%3e%3crect%20id='矩形'%20x='0'%20y='0'%20width='18'%20height='18'%3e%3c/rect%3e%3cg%20id='编组'%20transform='translate(2.000000,%203.000000)'%20fill='%23999999'%20fill-rule='nonzero'%3e%3cpath%20d='M3.0205,2.10810811%20L3.4027,0.866608114%20C3.56133386,0.351360067%204.03587843,0%204.57310001,0%20L9.42689999,0%20C9.96412157,0%2010.4386661,0.351360067%2010.5973,0.866608114%20L10.9795,2.10810811%20L12.075,2.10810811%20C13.138125,2.10810811%2014,2.97331081%2014,4.04054054%20L14,11.0675676%20C14,12.1347973%2013.138125,13%2012.075,13%20L1.92500001,13%20C0.86187501,13%200,12.1347973%200,11.0675676%20L0,4.04054054%20C0,2.97331081%200.861874994,2.10810811%201.92500001,2.10810811%20L3.0205,2.10810811%20Z%20M3.407775,3.16216216%20L1.92500001,3.16216216%20C1.69293558,3.16216216%201.4703759,3.25470533%201.30628157,3.41943323%20C1.14218724,3.58416113%201.05,3.8075801%201.05,4.04054054%20L1.05,11.0675676%20C1.05,11.300528%201.14218724,11.523947%201.30628157,11.6886749%20C1.4703759,11.8534028%201.69293558,11.9459459%201.92500001,11.9459459%20L12.075,11.9459459%20C12.3070644,11.9459459%2012.5296241,11.8534028%2012.6937184,11.6886749%20C12.8578128,11.523947%2012.95,11.300528%2012.95,11.0675676%20L12.95,4.04054054%20C12.95,3.8075801%2012.8578128,3.58416113%2012.6937184,3.41943323%20C12.5296241,3.25470533%2012.3070644,3.16216216%2012.075,3.16216216%20L10.592225,3.16216216%20C10.3620125,3.16214808%2010.1586644,3.01157673%2010.090675,2.79078379%20L9.594025,1.17790541%20C9.5713891,1.10430524%209.50363185,1.05405405%209.42689999,1.05405405%20L4.57310001,1.05405405%20C4.49636815,1.05405405%204.4286109,1.10430524%204.405975,1.17790541%20L3.909325,2.79060811%20C3.84139824,3.0114706%203.63803522,3.16212428%203.407775,3.16216216%20Z%20M7,9.83783784%20C5.5503,9.83783784%204.375,8.658%204.375,7.2027027%20C4.375,5.7474054%205.5503,4.56756756%207,4.56756756%20C8.4497,4.56756756%209.625,5.7474054%209.625,7.2027027%20C9.625,8.658%208.4497,9.83783784%207,9.83783784%20Z%20M7,8.78378378%20C7.86984848,8.78378378%208.575,8.07590967%208.575,7.2027027%20C8.575,6.32949573%207.86984848,5.62162162%207,5.62162162%20C6.13015152,5.62162162%205.425,6.32949573%205.425,7.2027027%20C5.425,8.07590967%206.13015152,8.78378378%207,8.78378378%20Z'%20id='形状'%3e%3c/path%3e%3c/g%3e%3c/g%3e%3c/g%3e%3c/g%3e%3c/svg%3e) The Spruce / Meg MacDonald
The Spruce / Meg MacDonaldHeadline: The Ultimate Guide to Feline Aural Hygiene: How to Clean Cat Ears in 8 Steps
Introduction:
As devoted cat owners, we strive to provide our furry companions with the utmost care and attention. Maintaining their hygiene, including their delicate ears, is paramount for their overall well-being. While cats are fastidious groomers, their ears may accumulate dirt, wax, and debris, potentially leading to discomfort and infections. In this comprehensive guide, we will explore how to clean cat ears effectively and safely, ensuring your feline friend's aural health and pristine appearance.
Step 1: Gather Necessary Supplies
* Cat ear cleaner (specifically formulated for cats)
* Cotton balls or gauze
* Tweezers (optional)
* Soft, warm towel
Step 2: Prepare Your Cat
* Choose a calm and comfortable environment where your cat feels relaxed.
* Secure your cat gently, holding their head and body in a secure manner.
Step 3: Examine the Ears
* With a flashlight or otoscope, inspect your cat's ears for any signs of redness, swelling, discharge, or excessive wax.
* If you notice any abnormalities, consult with your veterinarian promptly.
Step 4: Apply Ear Cleaner
* Gently squeeze a few drops of ear cleaner into each ear canal.
* Massage the base of the ear gently to distribute the cleaner evenly.
Step 5: Allow the Cleaner to Penetrate
* Hold your cat's head tilted slightly to one side to allow the cleaner to reach deep into the ear canal.
* Wait for a few minutes for the cleaner to dissolve any dirt or wax.
Step 6: Wipe Away Debris
* Dip a cotton ball or gauze into the ear cleaner and gently wipe around the outer ear canal and inner flaps.
* Use a tweezers to carefully remove any large pieces of wax or debris, if necessary.
Step 7: Dry the Ears
* Use a soft, warm towel to gently pat dry the ears, removing any remaining cleaner or debris.
* Avoid using cotton swabs, as they can push wax and debris further into the ear canal.
Step 8: Monitor and Repeat
* Inspect your cat's ears regularly for any signs of dirt or discharge.
* If your cat has excessive earwax or debris, you may need to clean their ears more frequently.
* Consult with your veterinarian if you have any concerns about your cat's ear health.
Additional Tips:
* Use a high-quality cat ear cleaner recommended by your veterinarian.
* Clean both ears, even if only one appears to be dirty.
* Avoid overcleaning, as this can irritate the ears.
* If your cat resists ear cleaning, consult with your veterinarian for alternative methods.
* Be patient and gentle throughout the process to avoid scaring or hurting your cat.
Examples of Ear Conditions and Signs to Watch For:
* Otitis Externa (External Ear Infection): Redness, swelling, discharge, odor, head shaking, scratching at the ears.
* Otitis Media (Middle Ear Infection): Pain, lethargy, head tilt, balance problems, hearing loss.
* Ear Mites: Intense itching, scratching, dark discharge, head shaking.
* Excessive Earwax: Brown or yellow discharge, blockage of the ear canal.
* Polyps: Growths in the ear canal that can cause hearing loss or discomfort.
By following these steps and adhering to our additional tips, you can effectively maintain your cat's ear health, preventing discomfort, infections, and ensuring their overall well-being. Remember to consult with your veterinarian if you have any concerns or notice any abnormalities in your cat's ears.
Explore More Pets
Cat Behavior Problems
How to Stop Aggression in Kittens

Long-Haired Cat Breeds
Siberian Cat: Breed Profile, Characteristics, & Care
Cat Behavior Problems
How to Stop Kittens From Scratching and Biting

Long-Haired Cat Breeds
Turkish Angora: Cat Breed Profile, Characteristics & Care
Basic Training
How to Socialize Your Kitten

Short-Haired Cat Breeds
Cute Pictures & Facts About Calico Cats & Kittens

Litter Box Training
Training Your Kitten to Use the Litter Box
Long-Haired Cat Breeds
10 Fun Facts About White Cats